3/20/2013

Solve Canon XF300 MXF files to FCP X Importing problems

Sumarry: How to successfully Import and edit Canon XF300 MXF videos in Final Cut Pro X on Mac Mountain Lion

Are you a Canon XF300 user? Are you looking for the way to bring MXF videos from XF300 to Final Cut Pro X after you installed the Mac OS X Mountain Lion? If so, you should found that many threads seem to point to needing a converter for these files before FCP X will read them. As Apple Inc.’s desktop and server operating system for Macintosh computers, OS X Mountain Lion (version 10.8) is the ninth major release of OS X. It’s quick, familiar, cheap, and drenched in iOS goodness. However, after updated and installed Mountain Lion on Mac, many Final Cut Pro (mainly FCP X and FCP 7) users found they could not import Canon MXF files into FCP.

In fact, I met the similar trouble. When I try importing my footage directly from the camera in the File/Import/Media... screen, FCP X tells me:
"No Importable Files"
"None of the selected files or folders can be imported."
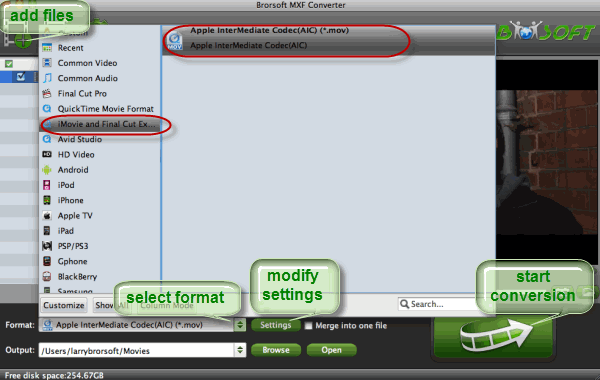
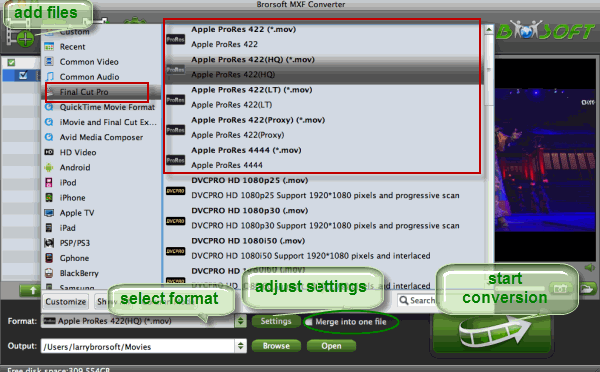
I met the error after I upgraded my Mac OS X to Mountain Lion v10.8.2. Then I went to Google and search the answer to solve the problem. At the start, I used Brosoft MXF Converter for Mac to transcode MXF to ProRes 422(The tool has five types of Apple ProRes Codecs for choosing). The conversion is fast and I can get the video with original quality for further editing. It also can help me reformat Panasonic, Sony MXF to any video format as I want. The most important is that The changed format ProRes 422 MOV is FCP's native format, I can directly drag and drop it to FCP without rendering.


However, if we use the convert tool, we won't get MXF videos to natively edit with FCP X. Some time later, Canon company released XF300 software compatible with OS 10.8 (Mountain Lion). We called it Canon XF Utility. After install the software, you can back up XF300 MXF footages to it and transfer the videos to Log and Transfer Windows. Then please choose ProRes or natvie format as the editing format. The process will take you some rendering time.


Related Post:
Transfer Canon XF305 recorded MPEG-2 MXF files to Final Cut Pro X
How to Take Canon EOS C500 MXF footages into FCE

3/06/2013

Can't take Canon EOS C500 MXF footages into FCE for further editing

Have you met some incompatible problems with EOS C500 MXF videos in FCE 4? The EOS C500 is a professional video camera. The designs come from EOS C300, but it is better than C300. It can capture Raw 4K video footage and offers frame rates of up to 120fps in compressed 4K. It also captures 2K footage (2,048 x 1,080 pixels) at 12-bit, with 4:4:4 Y'CbCr chroma sub-sampling for high colour resolution.

The HD videos are compatible with FCP, but are not editble for FCE. To get the best playback, some FCE users are likely try to import the HD quality to Final Cut Express 4 for further editing. But they won't successfully do the importing. We have to convert the MXF footages to a compatible for for editing with FCE. AIC(Apple Intermediate Codec) will be the best fotmat for converting. AIC is a high-quality 8-bit 4:2:0 video codec used mainly as a less processor-intensive way of working with long-GOP MPEG-2 footage such as HDV.

Aftering searching and comparisons, I found brorsoft MXF to FCE Converter would be your best choice. First, like other products, the software can transcode MXF to any file format. Secondly, it has the tool allows you freely change the video and audio settings to get the best quality for editing and playing. Next, it also can be worked as a powerful video editor, which can merge several files into one single and trim or crop videos. Last, it has been used for many people, I have searched many good reviews about the tool. I believe you will be satisfied with the fast conversion and HD quality.


Step 1. Connect your cam or CF card to your Mac. And launch the MXF Converter to load file to it.

Tip: You also can check "Merge into one" icon to batch convert several MXF clips.

Step 2. Choose the AIC MOV as the best ouput format from "iMovie/Final Cut Expree" menu.

Step 3. Click "settings" to set the video size, frame rate, bitrate, ect as you like, you'd better set the parameters as the below picture.


Step 4. Start reformating Canon C500 MXF to AIC for your Mac editors.

As long as the conversion is over, please click "completed" and "open" to find your converted file. Thus you can easiy transfer it to your FCE.

Tip: The convert tool also can help you transcode MXF videos from Panasonic/Sony to a comfortable format for FCP, FCE, iMovie, Adobe, Avid, ect NLE's.

Related Post:
Transfer Canon XF305 recorded MPEG-2 MXF files to Final Cut Pro X

2/25/2013

How to get Panasonic AG-HVX200 P2 MXF to iMovie for editing

With its AG-HVX200, Panasonic raises the bar again, bringing us professional HD versatility and quality at a lower price than ever. AG-HVX200 is a P2-based camera that answers the demands of nearly any professional videographer. It builds on the overwhelming success of the original AG-HVX200, with the addition of some much sought-after revisions. The most important new feature is an updated sensor, which yields higher sensitivity, creating less noise in low-light situations. With its compact and feature-rich frame, the AG-HVX200 will never disappoint. The unit is compatible with DVCPRO HD, DVCPRO50, DVCPRO25 and consumer DV recording standards.

Have you got the professional P2 camcorder. If so, have you tried to download MXF fotoages from P2 card to iMovie for further editing? If so, you won't find anything in iMovie because iMovie can't recognise MXF format. For example "I have P2 MXF files downloaded directly from a Panasonic P2 card onto an external hard drive. I want to edit my MXF files in iMovie '11, but frustratingly, iMovie '11 can’t ingest the MXF at all. Any solution can suggest?"

The MXF to iMovie Converter is the highly recommended for you to quickly and easily convert/transcode MXF/P2 MXF to iMovie '11 supported format here. The convert tool comes with default format for iMovie, Apple Intermediate Codec (AIC) MOV which is perfect format for iMovie 8/9/11. Below is the detailed guide on how to reformat MXF to AIC on Mac OS X.


Step 1: Install and launch the best MXF to iMovie Converter for Mac. Click the button “File” to add MXF files to it or directly drag and drop the files your MXF files. If it is necessary, you can double click the each file to have a preview.

Tips: If you have multiple HVX200 1080i MXF files, you can select the “Merge into one” box to merge the files into one single file for iMovie so that you can play these files without interruption.

Step 2: Click on the “Format” and you will get a dropdown menu. Move you pointer to iMovie and Final Cut Express > Apple Intermediate Codec(AIC) (*.mov). The Apple Intermediate Codec(AIC) is the compatible format for iMovie. Then you can set the output folder by clicking “Browse” icon as you need.

Step 3: Click the “Settings” icon and you will go into a new interface named “Profile Settings”.

Tips:
1: You’d better set the video frame rate as 30fps, video size as 1920*1080 to keep the best quality for editing in iMovie. If you want to have a smaller file size but keep the good quality, you can change the video size to 1440*1080.
2: You can customize the defaults and save them as custom conversion settings without affecting the original default selection.

Step 4: Click the “Convert” button; it will convert P2 MXF to AIC. You can find the process in the “Conversion” interface.

When the fast HVX200 MXF conversion process is 100% completed, you will be able to get the output files for iMovie by clicking on “open” button effortlessly.

Related guide:

Panasonic AG-HPX250 P2 HD MXF files to FCP 6/7

Copy Panasonic P2 MXF clips to Sony Vegas for freely editing

2/01/2013

Convert MXF to ProRes- Make Sony PMW-EX1R MXF files editable for FCP


Sony's PMW-EX1R XDCAM EX HD Camcorder is the impressive successor to the popular PMW-EX1. While retaining everything that was right about the previous camera, Sony has listened to its professional users and taken several steps forward, not only improving ergonomics and convenience, but bringing a whole new set of features to the world's only full HD compact camcorder.

Product Highlights
•3 1/2"-type CMOS Sensors
•1080p, 720p, 1080i
•Native 23.98p
•Full HD 1920 x 1080
•Wide Angle 14x Fujinon Lens
•1.23MP Viewfinder
•Records to SxS Cards
•DVCAM SD Mode
•Cache Recording
•HDMI Output

Such an excellent camcorder! But when you get the rewrap clips and want to copy and Sony's PMW-EX1R Rewarapped MXF to FCP for editing, you will meet the incompatiblity problem, since the FCP can not support the .mxf video files. How to make MXF files editable with the lossless quality? In this article, we will show you the best tool- Mac MXF to ProRes Converter for you. It can convert all the .mxf files, no matter where and how you get them, to ProRes 422(HQ) with the original quality.

Step 1: Connect Sony PMW-EX1 to Mac and rewrap the mp4 files to MXF file folder. Luanch the MXF to FCP Converter for Mac and click the "File" or the related import label to add the rewarapped MXF files to it.

Tip: You shouldn’t move the single MXF video out of the whole MXF whole structure folder, or the MXF video would loss some metadata, such as sound.

Step 2: Click on the “Format” and get the dropdown menu, then move you pointer to “Final Cut Pro> Apple PreRes 422(HQ)", if you give the priority to the quality of the converted videos.

Step 3. Then click the “Settings” icon and you will go into the “Profile Settings”. You can adjust codec, bit rate, frame rate, sample rate and audio channel in the interface according to your needs and optimize the output file quality.

Tricks:
1) If the your files are 1080 60i/30fps, you’d better set the video frame rate as 30fps, video size as 1920*1080 to keep the best quality for editing in Final Cut Pro.
2) If you shoot with 50i/25fps, then 25fps as the frame rate will be your best choice when conversion.
3) If you want to have a smaller file size but keep the good quality, you can change the video size to 1440*1080 or smaller.

Step 4: Click the button for conversion and the PMW-EX1R MXF converter will strart the Sony PMW-EX1R rewrapped MXF to ProRes conversion. You can find the process in the “Conversion” interface.


After the Mac conversion, you can now easily add the PMW-EX1R MXF files to FCP 7/x and edit them by clicking on “open” button. Now, you can get rid of the worries about the incompatibility problem of MXF and FCP.

1/02/2013

Solve trouble with Panasonic AG-HPX250 P2 HD 1080i MXF files in Final Cut Pro 6/7

During the search, I found that many P2 camcorder users are bothered by the incompatibility problem of AG-HPX250 and Final Cut Pro 6 or FCP 7, although some guys said Log and Transfer will help. It remind me of the solution to the same problem of Canon XF305 and FCP X and it works for the HPX250! In the post, you can find an easy way to solve the issue with a short time.

As we all know the Panasonic AG-HPX250 P2 HD Handheld Camcorder is the first handheld professional camcorder model to record the extremely high-quality AVC-Intra 100 Mb/s (10-bit 4:2:2) codec. Featuring an integrated 22x zoom lens and a 2.2 Mp 1/3"-type 3MOS imager, the versatile HPX250 records not only AVC-Intra but also several flavors of DVCPRO (including DVCPRO HD) as well as DV. A variety of frame rates are possible in DVCPRO modes, for native slow- and fast-motion effects. But its recorded HD video is not a good editing format- MXF.

To smoothly imput the P2 MXF files to FCP, we need a powerful MXF Converter for Mac, which can convert HPX250 mxf files to ProRes- FCP's native video format, including FCP 6/7 and FCP X. Considering the AG-HPX250 records in 1080i, its deinterlace feature will make your videos look better in FCP. Now, the following four easy steps will show you how to make the mxf files editable in FCP.'


Step 1: Connect Panasonic AG-HPX250 to Mac and load the mxf files from P2 card to the best MXF to ProRes Converter.
You can connec the AG-HVX200 to Mac via Firewire or a P2 reader. After that, please luanch the MXF to Prores Converter and add the mxf files to it.

Step 2: Find the suitable output video format in Format > FCP > ProRes 422 and then “Browse” for the output folder you need;

Step 3: Set 30fps as Frame Rate and 1920*1080 as Video Size to get the best effect in Setting > Profile Settings. After many trials, it is what I highly recommend;


Step 4: Click the botton for “Convert” and the MXF to FCP converter will start transcoding AG-HVX200 1080i MXF files to FCP on Mac with original quality.

When the MXF to ProRes conversion is over, you can easily find the converted video by clicking "open". The .mov video is FCP's best comfortable format, you can freely put and edit it with FCP 6/7. Have a good time on playing and editing HD movies, and happy new year!